
Current version: 2.1.0.0 - download from Autodesk App Store
Super simple, one-click Add-In will help you to automatically rename Wall Types, Floor Types, Ceiling Types and Roof Types using pre-set rename conditions.
Automatically rename Wall, Roof, Ceiling and Floor Family Types using specified naming structure. This Add-In will save time and help to organize your Autodesk® Revit® file. Every time you make new or duplicate existing Wall, Roof, Ceiling and Floor, just change the properties and click the Family Type Rename button and the Family Types will be renamed automatically.
For example: Int220 Pla10//Bri200//Pla10
Before renaming you will see a dialog that shows how many Types will be renamed. What were the old name and what will be the new name and is there any naming errors. You can specify naming options and choose Family Types in Settings.
Name cannot contain these characters \ : { } [ ] | ; < > ? ` ~
Name can contain these characters / ! @ # $ % ^ & * ( ) _ + , . -
General Usage Instructions:
First time usage:
Click on Settings button to set how parameters for renaming Family Types.
Then Click OK to save the settings for use in every project.
Then click on Rename button to open rename dialog. On the rename dialog you can see how many Family Types will be renamed, how many Family Types have invalid new names. You can also see what Category of Family Type will be renamed and the old and the new name of the Family Type.
Click OK to rename the Family Types or click Cancel.
Everyday usage:
Click on Rename button to open rename dialog.
Click OK - Family Types are renamed.
(no element selection is necessary)
Click this button to open Rename Types dialog. In this dialog you will see what Category of Family will be renamed, the Old Family Type name, the New Family Type name and if there is any renaming errors. You will also see how many Family Types will be renamed and if and how many rename error there is. Click OK to rename the Family Types without errors or click Cancel. If there is no name changes, the list will be empty.
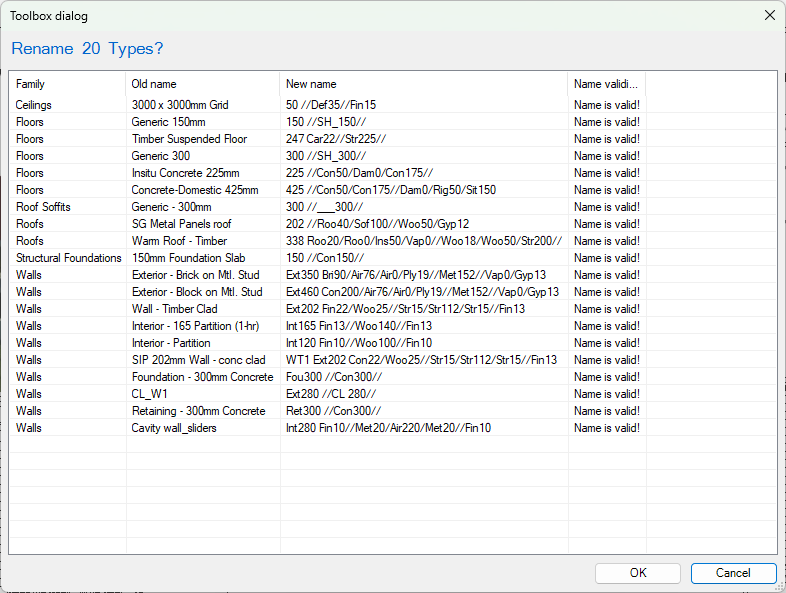
This is Rename dialog. Here you can see:
How many Types will be renamed after you click OK.
How many invalid new names are there. These names will not be applied to Family Types.
How many Types will be renamed after you click OK.
How many invalid new names are there. These names will not be applied to Family Types.
+ Family Category for the Type that is going to be renamed.
+ Old name of the Family Type.
+ New name that is going to be applied to Family Type.
+ Name validity check shows if there is any naming errors.
- The name is valid! - no errors
- Will create duplicate names in same Category! - This error is shown when the new name will be the same as some existing name.
- Name contains unsupported characters -
Name cannot contain these characters
\ : { } [ ] | ; < > ? ` ~
Name can contain these characters
/ ! @ # $ % ^ & * ( ) _ + , . -
Click this button to change and save rename conditions. These conditions (Settings) will be saved for use in all existing and future projects. To change Settings, open the Settings dialog, change conditions and click OK.
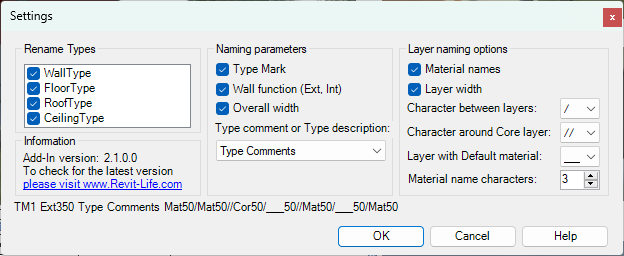
This is Settings dialog. Here you can set:
+ Rename Types
- What Categories of Families you would like to rename
+ Rename Types
- What Categories of Families you would like to rename
+ Naming parameters
- Parameters to use for naming structure. These parameters are taken from individual Family Type.
- Parameters to use for naming structure. These parameters are taken from individual Family Type.
+ Layer naming options
- These options influence how compound structure Layer name is added to Family Type name.
- These options influence how compound structure Layer name is added to Family Type name.
When you change naming conditions in Settings dialog, you can see schematic name preview above OK button.
Settings are saved for everyday use.