Current version: 1.0.2 - download from Autodesk App Store
This one-click Add-In will help you to automatically rename Doors, Windows, Columns, Text Notes, Model Texts, Filled Regions, Dimensions and Spot Dimensions using pre-set rename conditions.
Automatically rename Door, Window, Column, Text Note, Model Text, Filled Region, Dimension and Spot Dimension Family Types using specified naming structure. This Add-In will save time and help to organize your Autodesk® Revit® files.
Every time you make a new or duplicate an existing Family Type just change the properties and click the Rename button and the Family Types will be renamed automatically.
You can set the shortcut, for example RNM for the Rename command to rename Family Types even faster.
You can set the shortcut, for example RNM for the Rename command to rename Family Types even faster.
For example new names will be:
Doors: DO1 Ext 1000mm x 1000mm ... Suffix Text
Windows: WIN1 1000mm x 1000mm ... Suffix Text
Text Notes: 2mm Arial Black Italic Bold Underline Opaque Border ... Suffix Text
Model Text: 2mm Arial Red Italic Bold Underline ... Suffix Text
Dimensions: 2mm Arial Black Italic Bold Underline Opaque Border Diagonal 2 Center ... Suffix Text
Spot Dimensions: SpotBase 2mm Arial Red Italic Bold Underline Opaque Border Arrow Inline Elevation ... Suffix Text
Filled Regions: Vertical-small Blue Wood Green ... Suffix Text
You can choose which parameters to include in new name, what units and unit symbols to use and write suffix or prefix that will be added from existing element name.
For example, if existing Text Note name is Arial...Schedule, the new name will be 2mm Arial Black ... Schedule
For example, if existing Text Note name is Arial...Schedule, the new name will be 2mm Arial Black ... Schedule
Before renaming you will see a dialog that shows how many Elements will be renamed and if there are any naming errors.
You can specify naming options and choose Categories that will be renamed in Settings.
Name cannot contain these characters \ : { } [ ] | ; < > ? ` ~
Name can contain these characters / ! @ # $ % ^ & * ( ) _ + , . -
General Usage Instructions:
First time usage:
1. Click on the Settings button under Rename Elements split button to set parameters for renaming.
2. Then Click OK to save the settings for use in every project.
3. Then click on Rename button to open rename dialog. On the rename dialog, you can see how many Types will be renamed, and how many Types have invalid new names. You can also see Category, Family Name, old name and new name of the Type that will be renamed. Also if there are any errors.
4. Click OK to rename the Family Types or click Cancel to close dialog without any changes..
Everyday usage:
1. Click on Rename button to open rename dialog.
2. Click OK - Family Types are renamed.
(no element selection is necessary)
Click this button to open Rename Types dialog. In this dialog you will see what Category and Family name of the Type that will be renamed, the Old Family Type name, the New Family Type name and if there are any renaming errors. You will also see how many Types will be renamed and if and how many rename errors there are (Types with error will not be renamed). Click OK to rename the Types without errors or click Cancel. If there are no name changes, the list will be empty.
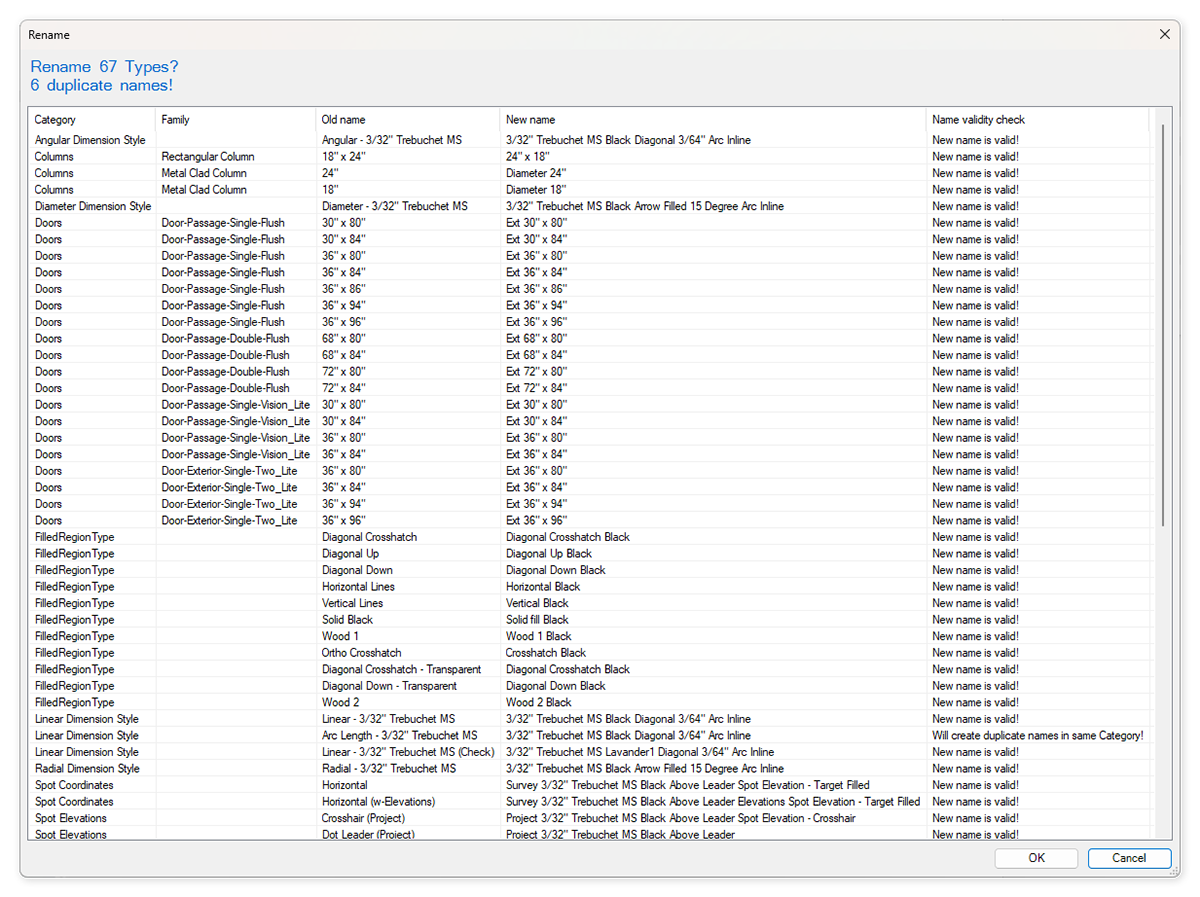
This is Rename dialog. Here you can see:
How many Types will be renamed after you click OK.
How many invalid new names are there. These names will not be applied to Family Types.
How many Types will be renamed after you click OK.
How many invalid new names are there. These names will not be applied to Family Types.
+Category name of the Type that will be renamed.
+ Family name for the Type that will be renamed.
+ Old name of the Family Type.
+ New name that is going to be applied to Family Type.
+ Name validity check shows if there is any naming errors.
- The name is valid! - no errors
- Will create duplicate names in same Category! - This error is shown when the new name will be the same as some existing name.
- Name contains unsupported characters -
Name cannot contain these characters
\ : { } [ ] | ; < > ? ` ~
Name can contain these characters
/ ! @ # $ % ^ & * ( ) _ + , . -
Click this button to change and save rename conditions. These conditions will be saved for use in all existing and future projects. To change conditions, open the Settings dialog, change select parameters that will be included in name and click OK. Move mouse cursor over the parameters to see additional information in tooltip.
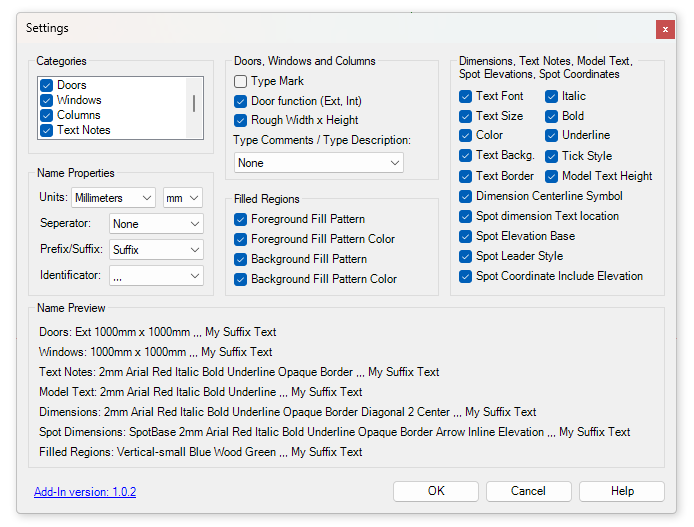
This is Settings dialog. Here you can set:
+ Categories
- What Categories you would like to rename.
+ Categories
- What Categories you would like to rename.
+ Name Properties
- Properties to use for naming structure. You can set Units and Unit Symbols that will be used in name. You can also set Separator character between name parameters. You can set a Prefix or Suffix that will be taken from old Type name with Prefix or Suffix Indicator characters.
- Properties to use for naming structure. You can set Units and Unit Symbols that will be used in name. You can also set Separator character between name parameters. You can set a Prefix or Suffix that will be taken from old Type name with Prefix or Suffix Indicator characters.
+ Doors, Windows, Columns, Filled Regions, Dimensions, Text Notes, Model Text and Spot Dimensions
- In each group you can set specific parameters that will be used in new name.
- In each group you can set specific parameters that will be used in new name.
+ Name Preview
- When you change naming conditions in Settings dialog, you can see schematic Name Preview for each category.
- When you change naming conditions in Settings dialog, you can see schematic Name Preview for each category.
Move mouse cursor over the parameters to see additional information in tooltip.
When you click OK, the Settings are saved for everyday use.